
We will build a RESTful API for a library. I will approach
the problem by building an API for books only, and then scaling it to
include all the other library items.
First Rollout: Build a Dumb Server
Before we start writing code, we need to fetch the
dependencies. Even though the only dependency is Express, I like to keep
a package.json file in case I ever decide to add other dependencies in
the future. So, the first thing we will do is create a file called
package.json and put the following code in it:
{
 name: library-rest-api,
 version:0.0.1,
 description:A simple library REST api,
 dependencies: {
 express:~3.1.0
 }
}
Now open up your terminal or command line and go to the project’s
directory. Type “npm install” to install Express. It will be installed
in the node_modules directory.Now that we have all the dependencies
ready, let’s create a simple server that will capture requests and
respond with a Hello World.
to start the server. The server should response with the hardcoded
data when you try to get a book and should echo back the data when you
try to do another operation, such as inserting, deleting, or updating.
After you install MongoDB, create a database called library_database. Then, add a collection named “books” to the database. Run the database server (mongod), and you should be all set.
// Module dependencies.
var application_root = __dirname,
express = require( 'express' ); //Web framework
//Create server
var app = express();
// Configure server
app.configure( function() {
//parses request body and populates request.body
app.use( express.bodyParser() );
//checks request.body for HTTP method overrides
app.use( express.methodOverride() );
//perform route lookup based on url and HTTP method
app.use( app.router );
//Show all errors in development
app.use( express.errorHandler({ dumpExceptions: true, showStack: true }));
});
//Router
//Get a list of all books
app.get( '/api/books', function( request, response ) {
var books = [
{
title: "Book 1",
author: "Author 1",
releaseDate: "01/01/2014"
},
{
title: "Book 2",
author: "Author 2",
releaseDate: "02/02/2014"
}
];
response.send(books);
});
//Insert a new book
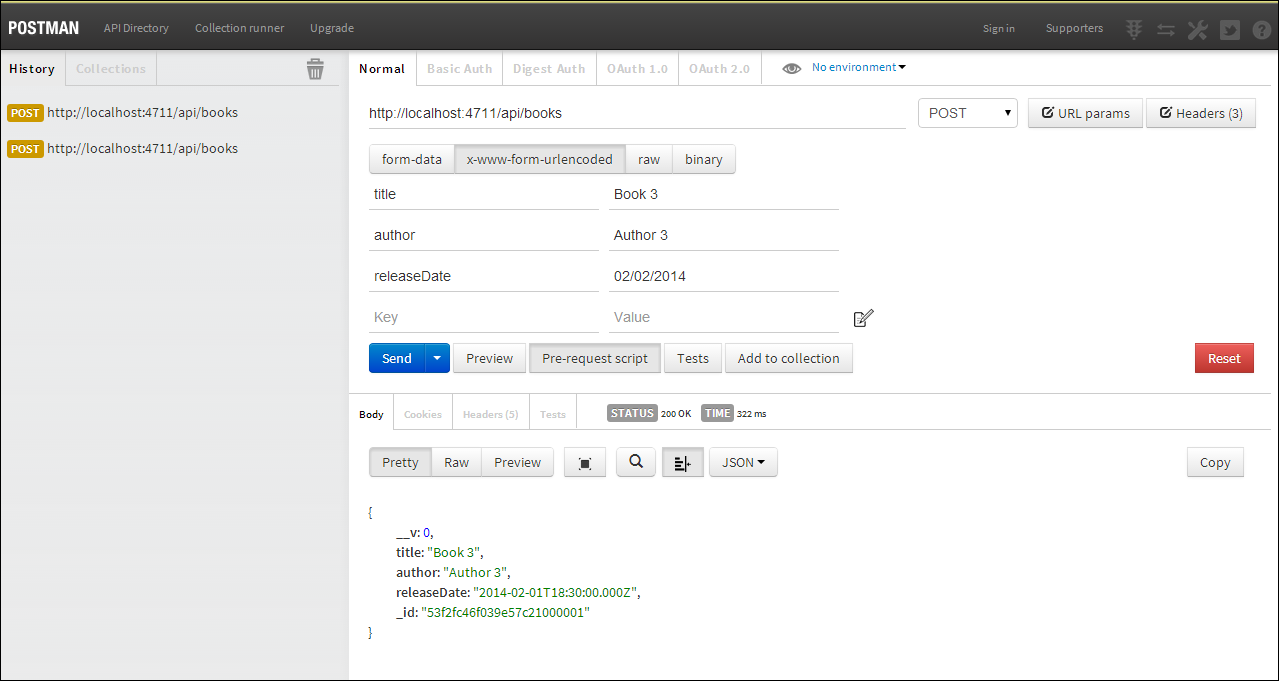
app.post( '/api/books', function( request, response ) {
var book = {
title: request.body.title,
author: request.body.author,
releaseDate: request.body.releaseDate
};
response.send(book);
});
//Get a single book by id
app.get( '/api/books/:id', function( request, response ) {
var book = {
title: "Unique Book",
author: "Unique Author",
releaseDate: "03/03/2014"
};
response.send(book);
});
//Update a book
app.put( '/api/books/:id', function( request, response ) {
response.send("Updated!");
});
//Delete a book
app.delete( '/api/books/:id', function( request, response ) {
response.send("Deleted");
});
//Start server
var port = 4711;
app.listen( port, function() {
console.log( 'Express server listening on port %d in %s mode', port, app.settings.env );
});
Save the file and runnode server.jsSetting up the Database
Before you start using real data in your API, you need to install MongoDB or use a third-party service like MongoHQ. Please refer to the instructions on the MongoDB website to install MongoDB.After you install MongoDB, create a database called library_database. Then, add a collection named “books” to the database. Run the database server (mongod), and you should be all set.
Second Rollout: Use Real Data
As always, before we start writing any code, we must have all the dependencies ready. The new dependency that we will introduce for this rollout is Mongoose. To install Mongoose, modify your package.json file to look as follows:{
"name": "library-rest-api",
"version": "0.0.1",
"description": "A simple library REST api",
"dependencies": {
"express": "~3.1.0",
"mongoose": "~3.5.5"
}
}
and run
To use Mongoose from our Node.js application, we first need to require it. Change the module dependencies code block to
Mongoose provides two neat classes for dealing with data: Schema and
model. Schema is used for data validation, and Model is used to send and
receive data from the database. We will now create a Schema and a Model
that adhere to our original data model.
Now we have everything ready to start responding to API requests.
Since all of the request/response processing happens in the router, we
will only change the router code it account for the persistent data. The
new router should look as follows:

Here we go, our REST API is now ready to roll.Happy coding :)
PS. This is how make it jsonp enable.
Add the ” app.set(“jsonp callback”, true);” to configuration. Now set response as jsonp as follows.
return response.jsonp( books );
npm install// Module dependencies. var application_root = __dirname, express = require( 'express' ), //Web framework path = require( 'path' ), //Utilities for dealing with file paths mongoose = require( 'mongoose' ); //Used for accessing a MongoDB databaseThen, we need to connect Mongoose to our database. We use the connect method to connect it to our local (or remote) database. Note that the url points to the database inside MongoDB (in this case it is library_database).
//Connect to database
mongoose.connect(
'mongodb://localhost/library_database'
);//Schema
var BookSchema = new mongoose.Schema({
title: String,
author: String,
releaseDate: Date
});
//Model
var BookModel = mongoose.model( 'Book', BookSchema );//Router
//Get a list of all books
app.get( '/api/books', function( request, response ) {
return BookModel.find(function( err, books ) {
if( !err ) {
return response.send( books );
} else {
console.log( err );
return response.send('ERROR');
}
});
});
//Insert a new book
app.post( '/api/books', function( request, response ) {
var book = new BookModel({
title: request.body.title,
author: request.body.author,
releaseDate: request.body.releaseDate
});
console.log(request.body.title);
book.save( function( err ) {
if( !err ) {
console.log( 'created' );
return response.send( book );
} else {
console.log( err );
return response.send('ERROR');
}
});
});
//Get a single book by id
app.get( '/api/books/:id', function( request, response ) {
return BookModel.findById( request.params.id, function( err, book ) {
if( !err ) {
return response.send( book );
} else {
console.log( err );
return response.send('ERROR');
}
});
});
//Update a book
app.put( '/api/books/:id', function( request, response ) {
return BookModel.findById( request.params.id, function( err, book ) {
book.title = request.body.title;
book.author = request.body.author;
book.releaseDate = request.body.releaseDate;
return book.save( function( err ) {
if( !err ) {
console.log( 'book updated' );
return response.send( book );
} else {
console.log( err );
return response.send('ERROR');
}
});
});
});
//Delete a book
app.delete( '/api/books/:id', function( request, response ) {
BookModel.findById( request.params.id, function( err, book ) {
return book.remove( function( err ) {
if( !err ) {
console.log( 'Book removed' );
return response.send( '' );
} else {
console.log( err );
return response.send('ERROR');
}
});
});
});
Here we go, our REST API is now ready to roll.Happy coding :)
PS. This is how make it jsonp enable.
Add the ” app.set(“jsonp callback”, true);” to configuration. Now set response as jsonp as follows.
return response.jsonp( books );

Source : https://github.com/supun/contentSynd
Web syndication is a must for any Website wishing to share some entries easily to other systems. Better known under their format name like RSS) or Atom), they can be quite time consuming to generate without a module handling all their formating. Thanks to the power of Node’s package manager NPM, you can generate yours in no time.
Installing the feed wrapper
Before we start, head to your project folder and install the latest version of the module feed:$ npm install feedBuilding the feed
First, we need to initialize a newFeed object. When you initialize the object, you must provide general information related to your Web syndication feed.var feed = new Feed({
title: 'My Feed Title',
description: 'This is my personnal feed!',
link: 'http://example.com/',
image: 'http://example.com/logo.png',
copyright: 'Copyright © 2013 John Doe. All rights reserved',
author: {
name: 'John Doe',
email: 'john.doe@example.com',
link: 'https://example.com/john-doe'
}
});
Second, you might want to identify your feed thematic. Both RSS) and Atom) formats offer the possibility to identify one or multiple categories. Again, this is super simple to add:feed.category('Node.js');
feed.category('JavaScript');
This is the implicit way of calling the render request. By default, it will render a RSS) feed. You an also use the explicit way, allowing you to select between RSS) or Atom):res.set('Content-Type', 'text/xml');
res.send(feed.render('rss-2.0'));
Here is the result.<rss version="2.0"> <channel> <title>My Feed Title</title> <description>This is my personnal feed!</description> <link>http://example.com/</link> <author>john.doe@example.com (John Doe)</author> <lastBuildDate>Tue, 31 Dec 2013 08:37:55 GMT</lastBuildDate> <image>http://example.com/logo.png</image> <copyright>Copyright © 2013 John Doe. All rights reserved</copyright><generator>Feed for Node.js</generator> </channel> </rss>

Credential is easy password hashing and verification in Node. Protects against brute force, rainbow tables, and timing attacks.
Employs cryptographically secure, per password salts to prevent rainbow table attacks. Key stretching is used to make brute force attacks impractical. A constant time verification check prevents variable response time attacks.
The latest version won’t throw if you try to hash or verify with an undefined or empty password. Instead, it passes an error into the callback so you can handle it more easily in your application.
Installing
npm install –save credential.Hash()
var pw = require('credential'),
 newPassword ='password';
pw.hash(newPassword,function(err,hash){
 if(err){throw err;}
 console.log('Store the password hash.', hash);
});
.Verify()
var pw = require('credential'),
 storedHash = '{"hash":"PJM0MHOz+qARffD4kJngkBlzGeR1U5ThUMx3aPW+qVokea7t5UhKXU8z8CTHTaf3MYLpnt/8dtdaCf7GxMUXr0cJ","salt":"oLfUniVJ9YcpNGzpAi8AQxzGzVBzC26AgsnmjNlEXWR6XGWl+08b+b5Px7jSebErDjkEuoovqkMpnk9D52gkA1M0","keyLength":66,"hashMethod":"pbkdf2","workUnits":60}',
 userInput = 'I have a really great password.';
pw.verify(storedHash, userInput, function (err, isValid) {
 var msg;
 if (err) { throw err; }
 msg = isValid ? 'Passwords match!' : 'Wrong password.';
 console.log(msg);
});
Here is the sourcecode for the project : https://github.com/supun/NodeExpress
Writing to the database is not particularly difficult. Essentially we need to set up a route that takes a POST, rather than a GET. We could use AJAX here, and honestly that’s my preference most of the time … but that’s really a whole different tutorial, so we’ll stick to a standard post-and-show-results approach. Once again, though, it’s not too hard to adapt things to work that way if you want.
If you restart your node server and go to http://localhost:3000/newuser you’ll see your form in all its glory.

Go ahead and submit. Enjoy the “can’t post to /adduser” error. We’re about to fix that.
Now add the following at the bottom of the app.js:
Go back to /routes/index.js and let’s create our insertion function. This is a big one, so I’ve commented the code pretty thoroughly. Here it is:

It will redirect to userslist.

Reference : http://cwbuecheler.com/web/tutorials/2013/node-express-mongo/
Writing to the database is not particularly difficult. Essentially we need to set up a route that takes a POST, rather than a GET. We could use AJAX here, and honestly that’s my preference most of the time … but that’s really a whole different tutorial, so we’ll stick to a standard post-and-show-results approach. Once again, though, it’s not too hard to adapt things to work that way if you want.
STEP 1 – CREATE YOUR DATA INPUT
We’re going quick and dirty here: two ugly, unstyled text inputs and a submit button. 1996-style. Just like before, we’ll start with app.get(); and then give it something to get. Open up app.js and find the part with all of those app.get() calls, and add this to the bottom of them:app.get('/newuser', routes.newuser);
So that you get:app.get('/', routes.index);
app.get('/users', user.list);
app.get('/helloworld', routes.helloworld);
app.get('/userlist', routes.userlist(db));
// New Code
app.get('/newuser', routes.newuser);
As with all app.get requests, we need to adjust the route to know
what to serve up. Open up /routes/index.js and add the following:exports.newuser = function(req, res){
res.render('newuser', { title: 'Add New User' });
};
Now we just need a template, as newuser.jade, and replace the whole file contents with this:extends layout block content h1= title form#formAddUser(name="adduser",method="post",action="/adduser") input#inputUserName(type="text", placeholder="username", name="username") input#inputUserEmail(type="text", placeholder="useremail", name="useremail") button#btnSubmit(type="submit") submitHere we’re creating a form with the ID “formAddUser” (I like to preface my IDs with the type of thing we’re ID’ing. It’s a personal quirk). Method is post, action is adduser. Pretty straightforward. Under that we’ve defined our two inputs and our button.
If you restart your node server and go to http://localhost:3000/newuser you’ll see your form in all its glory.

Go ahead and submit. Enjoy the “can’t post to /adduser” error. We’re about to fix that.
STEP 2 – CREATE YOUR DB FUNCTIONS
OK, same process as before. First we edit app.js, then our route file, and then our Jade template. Except there’s no Jade template here because we’re posting and then forwarding. See below. It’ll all make sense! Let’s start: Open app.js and once again find your stack of app.get calls:Now add the following at the bottom of the app.js:
app.post('/adduser', routes.adduser(db));
Note that that’s an app.post, not an app.get. If you want to separate
it from the app.gets with a comment or newline, I won’t stop you. Let’s
set up our route.Go back to /routes/index.js and let’s create our insertion function. This is a big one, so I’ve commented the code pretty thoroughly. Here it is:
exports.adduser = function(db) {
 return function(req, res) {
 // Get our form values. These rely on the "name" attributes
 var userName = req.body.username;
 var userEmail = req.body.useremail;
 // Set our collection
 var collection = db.get('usercollection');
 // Submit to the DB
 collection.insert({
 "username" : userName,
 "email" : userEmail
 }, function (err, doc) {
 if (err) {
 // If it failed, return error
 res.send("There was a problem adding the information to the database.");
 }
 else {
 // If it worked, set the header so the address bar doesn't still say /adduser
 res.location("userlist");
 // And forward to success page
 res.redirect("userlist");
 }
 });
 }
}
Assuming your server is running, which it should be, return to your web browser and point it at http://localhost:3000/newuser again.
There’s our exciting form, just like before. Except now let’s fill in
some values before we hit submit. I went with username “noderocks” and
email “noderocks@rockingnode.com” … you can go with whatever you’d like.
It will redirect to userslist.

Reference : http://cwbuecheler.com/web/tutorials/2013/node-express-mongo/

Here is the first part of this post. This post will demonstrate on how to connect your node js application into mongodb database.
Database :

Content :
{
 _id: ObjectId("52bbc6a47e197b1e8d00004a"),
 username: "testuser1",
 email: "testuser1@testdomain.com"
}
Here is the modified app.js file/**
* Module dependencies.
*/
var express = require('express');
var routes = require('./routes');
var user = require('./routes/user');
var http = require('http');
var path = require('path');
// New Code
var mongo = require('mongodb');
var monk = require('monk');
var db = monk('mongodb://<username>:<password>@paulo.mongohq.com:10049/nodeexpress1'); // remote mongodb databse
//var db = monk('localhost:27017/nodeexpress1'); this is for the local db connections.
var app = express();
// all environments
app.set('port', process.env.PORT || 3000);
app.set('views', path.join(__dirname, 'views'));
app.set('view engine', 'jade');
app.use(express.favicon());
app.use(express.logger('dev'));
app.use(express.json());
app.use(express.urlencoded());
app.use(express.methodOverride());
app.use(express.cookieParser('your secret here'));
app.use(express.session());
app.use(app.router);
app.use(express.static(path.join(__dirname, 'public')));
// development only
if ('development' == app.get('env')) {
app.use(express.errorHandler());
}
app.get('/', routes.index);
app.get('/users', user.list);
app.get('/helloworld',routes.helloworld);
app.get('/userlist', routes.userlist(db)); // this will load the db data to html
http.createServer(app).listen(app.get('port'), function(){
console.log('Express server listening on port ' + app.get('port'));
});
Now create userlist.jade as follows.extends layout
block content
h1.
User List
ul
each user, i in userlist
li
a(href="mailto:#{user.email}")= user.username
This will display the username with the attached link with email address.Now run the app using node app.js command
Go to http://localhost:3000/userlist link. Here is the result

And this is how jade works.
example.jade
doctype html
html(lang="en")
 head
 title= pageTitle
 script(type='text/javascript').
 if (foo) {
 bar(1 + 5)
 }
 body
 h1 Jade - node template engine
 #container.col
 if youAreUsingJade
 p You are amazing
 else
 p Get on it!
 p.
 Jade is a terse and simple
 templating language with a
 strong focus on performance
 and powerful features.
equivalent html fileexample.html
<!DOCTYPE html>
<html lang="en">
 <head>
 <title>Jade</title>
 <script type="text/javascript">
 if (foo) {
 bar(1 + 5)
 }
 </script>
 </head>
 <body>
 <h1>Jade - node template engine</h1>
 <div id="container" class="col">
 <p>You are amazing</p>
 <p>
 Jade is a terse and simple
 templating language with a
 strong focus on performance
 and powerful features.
 </p>
 </div>
 </body>
</html>
cheers :)
Nodejs is a platform built on Chrome’s JavaScript runtime for easily building fast, scalable network applications. Node.js uses an event-driven, non-blocking I/O model that makes it lightweight and efficient, perfect for data-intensive real-time applications that run across distributed devices.
This project will run on the node.js server with express and jade frameworks. The database is backed by mongodb :).
Installing nodejs.
This is really easy. Hit the Node.js website and click the big green Install button. It’ll detect your OS and give you the appropriate installer (if for some reason it doesn’t, click the downloads button and grab the one you need). Run the installer. That’s it, you have installed Node.js and, equally important, NPM – Node Package Manager – which lets you add all kinds of great stuff to Node quickly and easily.
- Open a command prompt
-
cd to the directory in which you wish to keep your test apps
(for the purposes of this example, C:\node).
Express is a framework which is capable of turning the raw node into an application that behaves more like web servers.
To get express, type this command
C:\node>npm install -g express
This installs some core Express functionality right into our Node installation, making it available globally so we can use it anywhere we want. That’s handy. You’ll see a bunch of text in your command prompt, mostly a lot of http 304’s and GETs. That’s fine. Express is now installed and available.
Create an express project
We’re going to use Express and Jade, but not the Stylus CSS preprocessor (which people often use in this stack). We’re just going to use straight CSS for right now. We have to use Jade or another templating engine to gain access to our Node/Express-based data. Jade’s not hard to learn if you already know HTML. Just remember that you really have to pay attention to indentation or things will go badly wrong.
Anyway, still in c:\node or wherever you’re storing your node apps, type this:
C:\node>express –sessions nodetest1
This will generate something like this.
create : nodetest1
create : nodetest1/package.json
create : nodetest1/app.js
create : nodetest1/routes
create : nodetest1/routes/index.js
create : nodetest1/routes/user.js
create : nodetest1/views
create : nodetest1/views/layout.jade
create : nodetest1/views/index.jade
create : nodetest1/public/images
create : nodetest1/public/javascripts
create : nodetest1/public
create : nodetest1/public/stylesheets
create : nodetest1/public/stylesheets/style.css
install dependencies:
$ cd nodetest1 && npm install
run the app:
$ node app
Edit dependencies
open package.json according to this.
{
 "name": "application-name",
 "version": "0.0.1",
 "private": true,
 "scripts": {
 "start": "node app.js"
 },
 "dependencies": {
 "express": "3.4.7",
 "jade": "*",
 "mongodb": "*",
 "monk": "*"
 }
}
now do this command.C:\node\nodetest1>npm install
Now run the application using following command.
C:\node\nodetest1>node app.jsAwesome! Open a browser and head for http://localhost:3000 where you will see a welcome to Express page.

Here is the sample Project on github.
https://github.com/supun/NodeExpress
While working with the integration of jquery data table with
nodejs via express framework, encountered some problems of loading css
and js files to the web application. Here is the app.js code i have used
before fixing the issue.
</p>
var express = require('express')
, app = express() // Web framework to handle routing requests
, cons = require('consolidate') // Templating library adapter for Express
, MongoClient = require('mongodb').MongoClient // Driver for connecting to MongoDB
, routes = require('./routes'); // Routes for our application
MongoClient.connect('mongodb://localhost:27017/school', function(err, db) {
"use strict";
if(err) throw err;
// Register our templating engine
app.engine('html', cons.swig);
app.set('view engine', 'html');
app.set('views', __dirname + '/views');
// Express middleware to populate 'req.cookies' so we can access cookies
app.use(express.cookieParser());
// Express middleware to populate 'req.body' so we can access POST variables
app.use(express.bodyParser());
// Application routes
routes(app, db);
app.listen(3000);
console.log('Express server listening on port 3000');
});
Here is the part html file i have used.
<title>School List</title>
 <style type="text/css" title="currentStyle">
 @import "media/css/demo_page.css";
 @import "media/css/demo_table.css";
 </style>
 <script type="text/javascript" language="javascript" src="media/js/jquery.js"></script>
 <script type="text/javascript" language="javascript" src="media/js/jquery.dataTables.js"></script>
 <script type="text/javascript" charset="utf-8">
 $(document).ready(function() {
 $('#example').dataTable();
 } );
 </script>
The above node.js code will create and run the server at
port 3000. Since we are using express as MVC framework we need the tell
the server about the location of static files as follows.
app.use(express.static(__dirname + '/views'));
This code segment should be put under the app.set(); code line. And here is the folder structure.
Project
app.js
/views
/media
/index.html
Post a Comment